Wednesday, 6 January 2010

Cover Research -- Jay Z

During lesson we textually analysed Jay Z's most recent album cover 'The Blueprint 3' (shown on the left). We also looked at his previous album covers, to look at how his career focus changed, with his picture being in the for front or him being the main focus, to his most recent one, where he took it back to him being about the music, and how
music is a form of art.


Looking into his album covers we saw how is the centre of attention, as that is how new artists start out, were the record label decides everything, were they used Jay Z's genre of Hip Hop and the Thug look, and close ups of him.

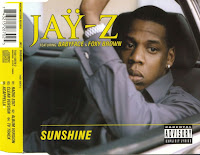
The close ups and Thuggish look makes to audience feel intimidated by him, but as Jay Z became more successful in his music career he came to have more say in the what he did and made it more about the music than him shown in the first picture of his most recent album cover.


Jay Z over time has become more noticed for his music than him, and has become a producer in his own right for himself and other artists. he has also collaborated with artists outside of his genre like; Linkin Park, showing that any genre can produce great music together as it is about the music and not the artist them self. Using Jay Z as a influence I want my band cover image to be more about the music, the artist is creating.

Editing;

In this session myself and Sam uploaded our footage began to edit the footage on Final Cut, using split screen again but with 3 screens a main one and to smaller ones.

On one of the small screens I used the clip were I run up to the camera and wave then run back, on this clip I added an echo effect which made it look mad as it left a trail. I then made the screen get bigger on the beat of the music, till it took over the whole screen, this added to the 'mad' idea and also keeps the audiences attention as the screen keeps changing.

Filming;

In a previous session we decided that we needed more clips of our artist, doing something mad to relate to the band name 'The Madettes'. For this filming session I decided that I would wear odd socks as it added to the 'mad' theme that we were going for.

So we decided to film the main artist (myself), first we decided to use a tripod and film me dancing on the tables, we thought this would b a good place as the classroom still relates to the school theme and dancing on tables is something that a pupil would not be doing. Sam then held to camera at low angle, were I ran up to the camera and waved at it, this makes the audience feel involved. We filmed me dancing several times were I did different 'funny' dance moves which a mature audience member can relate to and younger audience might laugh at.

Editing;

As a group we decided to add effects to our music video, to make it more appealing to a younger audience, whilst the choice of song appealed to a more mature audience. You use of colours and effects also relates to our band name of 'The Madettes'.

This music video breaks the conventions of Ska through the use of colour, as we have a moving colour sequence in our video which we did on Final Cut using the colour corrector tool. We also used a super imposition tool over me singing, to modernise our genre for today's audience.

Editing;

In this lesson we began to edit the second chorus within the song and for this we decided to use a split screen, showing four different clips at the same time.

This allows us to continue our theme of squares within the music video, as this would make it more interesting for the audience watching the video as it gives them choice of what to look at. This idea was also used in a Ska music video by The Selector.

Tuesday, 3 November 2009

Filming; Instruments

In this session we as a group decided to film some shots of the band playing instruments, we decided to do this as it was a common trait that we had seen in Ska 2tone artists work, and therefore we felt it was an important part that needed to be included in our music video. This included some extreme close ups shots of Stacey pressing buttons on the saxophone and chords being played on a bass guitar.

We also filmed some long shots so that we could have Stacey playing both the guitar and saxophone at the same time. This would be more difficult to edit using Final Cut as we would have to crop some of the shot.

I felt this schedule was successful as we got a lot of effective shots that can be used in the video as cut a ways and the close up of the saxophone can be shown on the actually part where the saxophone is heard.


Sunday, 1 November 2009

Uploading

We spent this lesson uploading our re-shoot onto our music video, this was because we needed this footage so that we could continue editing. As we had already done a lot of our video already when we realised we needed to re-shoot.

However I took this time to begin experimenting on Final Cut as I have never used it before, so I started by experimenting on a clip that we weren't going to use and worked on the using the colour corrector and making it change throughout the clip. After doing this we decided that we would use this idea in the music video.